♠ Posted by ggg in All box setup file

china sony xperia lt26 master flash file
♠ Posted by ggg
latest] Uberizer v1.7 21OCT2013
♠ Posted by ggg in All Android tools
Uberizer v1.7 by HcH [www.TechKnow.me]
__________________________________________________ _________________________
.|ÛÛÛÛÛÛÛÛÛÛÛÛÛÛÛÛÛÛÛÛÛÛÛÛÛÛÛÛÛÛÛÛÛÛÛÛÛÛÛÛÛÛÛÛÛÛÛÛ ÛÛÛÛÛÛÛÛÛÛÛÛÛÛÛÛÛÛÛÛÛÛÛÛÛÛÛ|.
||ÛÛÛÛÛÛÛÛÛÛÛÛÛÛÛÛÛÛÛÛÛÛÛÛÛÛÛÛÛÛÛÛÛÛÛÛÛÛÛÛÛÛÛÛÛÛÛÛ ÛÛÛÛÛÛÛÛÛÛÛÛÛÛÛÛÛÛÛÛÛÛÛÛÛÛÛ||
||ÛÛÛÛÛÛÛÛÛÛÛÛÛÛÛÛÛÛÛÛÛÛÛÛÛÛÛÛÛÛÛÛ ÛÛÛÛÛÛÛÛÛÛÛÛÛÛÛÛÛÛÛÛÛÛÛÛÛÛÛÛÛÛÛÛ||
||ÛÛÛÛÛÛÛÛÛÛÛÛÛÛÛÛÛÛÛÛÛÛÛ ÛÛÛÛÛÛÛÛÛÛÛÛÛÛÛÛÛÛÛÛÛÛÛ||
||ÛÛÛÛÛÛÛÛÛÛÛÛÛÛÛ ÛÛÛÛÛÛÛÛÛÛÛÛÛÛÛÛÛÛ||
||ÛÛÛÛÛÛÛÛÛÛÛ ÛÛÛÛÛÛÛÛÛÛÛ||
||ÛÛÛÛÛÛÛ _____________ ÛÛÛÛÛÛÛ||
||ÛÛÛÛ .' '. ÛÛÛÛ||
||ÛÛ / \ ÛÛ||
||Û /', ,'\ Û||
|| | ' ' | ||
|| Uberizer | '. .' | TechKnow ||
|| --___' '___-- ||
|| . _ . ||
|| : /_\ : ||
|| "' " '" ||
|| "'"" .___. ""'" ||
|| "' /_____\ '" ||
|| " . . " ||
|| : : : : ||
|| "' '" ||
|| "'"" ""'" ||
|| "' '" ||
|| " " ||
|| : : ||
|| ||
||Û >!< DON'T HURT THE NERD >!< Û||
||ÛÛ ÛÛ||
||ÛÛÛÛ HcH[********Hacker] ÛÛÛÛ||
||ÛÛÛÛÛÛÛÛ ÛÛÛÛÛÛÛÛ||
||ÛÛÛÛÛÛÛÛÛÛÛÛ -presents- ÛÛÛÛÛÛÛÛÛÛÛÛ||
||ÛÛÛÛÛÛÛÛÛÛÛÛÛÛÛÛ ÛÛÛÛÛÛÛÛÛÛÛÛÛÛÛÛÛÛÛ||
||ÛÛÛÛÛÛÛÛÛÛÛÛÛÛÛÛÛÛÛÛÛÛÛÛ ÛÛÛÛÛÛÛÛÛÛÛÛÛÛÛÛÛÛÛÛÛÛÛÛ||
||ÛÛÛÛÛÛÛÛÛÛÛÛÛÛÛÛÛÛÛÛÛÛÛÛÛÛÛÛÛÛÛÛ ÛÛÛÛÛÛÛÛÛÛÛÛÛÛÛÛÛÛÛÛÛÛÛÛÛÛÛÛÛÛÛÛ||
||ÛÛÛÛÛÛÛÛÛÛÛÛÛÛÛÛÛÛÛÛÛÛÛÛÛÛÛÛÛÛÛÛÛÛÛÛÛÛÛÛÛÛÛÛÛÛÛÛ ÛÛÛÛÛÛÛÛÛÛÛÛÛÛÛÛÛÛÛÛÛÛÛÛÛÛÛ||
||ÛÛÛÛÛÛÛÛÛÛÛÛÛÛÛÛÛÛÛÛÛÛÛÛÛÛÛÛÛÛÛÛ ÛÛÛÛÛÛÛÛÛÛÛÛÛÛÛÛÛÛÛÛÛÛÛÛÛÛÛÛÛÛÛ||
||ÛÛÛÛÛÛÛÛÛÛÛÛÛÛÛÛÛÛÛÛÛÛÛ ÛÛÛÛÛÛÛÛÛÛÛÛÛÛÛÛÛÛÛÛÛÛÛ||
||ÛÛÛÛÛÛÛÛÛÛÛÛÛÛÛ ÛÛÛÛÛÛÛÛÛÛÛÛÛÛÛÛÛÛ||
||ÛÛÛÛÛÛÛÛÛÛÛ ÛÛÛÛÛÛÛÛÛÛÛ||
||ÛÛÛÛÛÛÛ ÛÛÛÛÛÛÛ||
||ÛÛÛÛ ÛÛÛÛ||
||ÛÛ ÛÛ||
||Û \ / Û||
| ________________________/\ Uberizer v1.7 /\_______________________ |
.' / \ '.
| /T=---------------------------------=T=---------------------------------=T\ |
|| | .RLS.Date. : 21/OKT/2013 | ..Language.. : English | ||
|| | ....OS.... : WinALL | .Protection. : Does not apply | ||
|| | ...Type... : Android Manager | ...Hacker... : HcH | ||
| \I=---------------------------------=I=---------------------------------=I/ |
[ ] [ ]
/ \
| INFO: |
|| Uberizer is a tool to manage Android devices: ||
|| connect, backup, control, debug, unlock full play store, mod, optimize, ||
|| personalise, root, monitor, improve, and many more features! In total, ||
|| Uberizer offers 176 functions to mod/hack/optimize Android devices and ||
|| even Android apps! ||
| \ / |
[ ] [ ]
/ \
| |
| |
: :
:: ::
'" __________________________________________________ ___________<CRAPASCII> '"
]| / \ |[
||/ \||
|/ \|
: :


Uberizer main menu overview:
a. Analyse / detect device
b. Build Menu
c. Root Menu
d. Backup Menu
e. Bootanimation Menu
f. Multi Mod Tool Menu
g. Application Manager Menu
h. Help me
i. AllWinner Firmware Menu
j. Google Play Store Menu
k. Various Menu
l. Files to SD
m. Donate to TechKnow
o. Open Uberizer directory
p. WiKey, PC Keyboard to Android Device
q. Quit
r. Reboot device
s. System analyzer
t. Install TechKnow ToolKit to device
u. Update Uberizer
w. Wireless Uberizer mode
x. Install Virtual OldPC 95 to device
z. ZDiR
Uberizer main menu details:
a. Analyse device (find model)
- Rescans for a device, use this after connecting another android device to your computer.
b. Build Menu
+ 1.Auto Mod build.prop
* Automatically adds several build.prop tweaks and enhancements.
+ 2.Edit build.prop and push it back
* A handy way to quickly check or edit a few build properties.
+ 3.Market build.prop fixes
* Strips out the current market fingerprint and copies the modded build.prop to the
device. Currently this emulates a Samsung for full market (Google Play) access.
+ 4.Backup current build.prop on device
* Dumps a copy of your build.prop to \backups, the prop dump name includes your model
name, the current date and time of dump. To easily restore these backups, run 5.
+ 5.Restore a build.prop backup
* Indexes all backupped build.prop files on the system and allows the user to chose
which file (s)he wants to restore on the tablet.

__________________________________________________ _________________________
.|ÛÛÛÛÛÛÛÛÛÛÛÛÛÛÛÛÛÛÛÛÛÛÛÛÛÛÛÛÛÛÛÛÛÛÛÛÛÛÛÛÛÛÛÛÛÛÛÛ ÛÛÛÛÛÛÛÛÛÛÛÛÛÛÛÛÛÛÛÛÛÛÛÛÛÛÛ|.
||ÛÛÛÛÛÛÛÛÛÛÛÛÛÛÛÛÛÛÛÛÛÛÛÛÛÛÛÛÛÛÛÛÛÛÛÛÛÛÛÛÛÛÛÛÛÛÛÛ ÛÛÛÛÛÛÛÛÛÛÛÛÛÛÛÛÛÛÛÛÛÛÛÛÛÛÛ||
||ÛÛÛÛÛÛÛÛÛÛÛÛÛÛÛÛÛÛÛÛÛÛÛÛÛÛÛÛÛÛÛÛ ÛÛÛÛÛÛÛÛÛÛÛÛÛÛÛÛÛÛÛÛÛÛÛÛÛÛÛÛÛÛÛÛ||
||ÛÛÛÛÛÛÛÛÛÛÛÛÛÛÛÛÛÛÛÛÛÛÛ ÛÛÛÛÛÛÛÛÛÛÛÛÛÛÛÛÛÛÛÛÛÛÛ||
||ÛÛÛÛÛÛÛÛÛÛÛÛÛÛÛ ÛÛÛÛÛÛÛÛÛÛÛÛÛÛÛÛÛÛ||
||ÛÛÛÛÛÛÛÛÛÛÛ ÛÛÛÛÛÛÛÛÛÛÛ||
||ÛÛÛÛÛÛÛ _____________ ÛÛÛÛÛÛÛ||
||ÛÛÛÛ .' '. ÛÛÛÛ||
||ÛÛ / \ ÛÛ||
||Û /', ,'\ Û||
|| | ' ' | ||
|| Uberizer | '. .' | TechKnow ||
|| --___' '___-- ||
|| . _ . ||
|| : /_\ : ||
|| "' " '" ||
|| "'"" .___. ""'" ||
|| "' /_____\ '" ||
|| " . . " ||
|| : : : : ||
|| "' '" ||
|| "'"" ""'" ||
|| "' '" ||
|| " " ||
|| : : ||
|| ||
||Û >!< DON'T HURT THE NERD >!< Û||
||ÛÛ ÛÛ||
||ÛÛÛÛ HcH[********Hacker] ÛÛÛÛ||
||ÛÛÛÛÛÛÛÛ ÛÛÛÛÛÛÛÛ||
||ÛÛÛÛÛÛÛÛÛÛÛÛ -presents- ÛÛÛÛÛÛÛÛÛÛÛÛ||
||ÛÛÛÛÛÛÛÛÛÛÛÛÛÛÛÛ ÛÛÛÛÛÛÛÛÛÛÛÛÛÛÛÛÛÛÛ||
||ÛÛÛÛÛÛÛÛÛÛÛÛÛÛÛÛÛÛÛÛÛÛÛÛ ÛÛÛÛÛÛÛÛÛÛÛÛÛÛÛÛÛÛÛÛÛÛÛÛ||
||ÛÛÛÛÛÛÛÛÛÛÛÛÛÛÛÛÛÛÛÛÛÛÛÛÛÛÛÛÛÛÛÛ ÛÛÛÛÛÛÛÛÛÛÛÛÛÛÛÛÛÛÛÛÛÛÛÛÛÛÛÛÛÛÛÛ||
||ÛÛÛÛÛÛÛÛÛÛÛÛÛÛÛÛÛÛÛÛÛÛÛÛÛÛÛÛÛÛÛÛÛÛÛÛÛÛÛÛÛÛÛÛÛÛÛÛ ÛÛÛÛÛÛÛÛÛÛÛÛÛÛÛÛÛÛÛÛÛÛÛÛÛÛÛ||
||ÛÛÛÛÛÛÛÛÛÛÛÛÛÛÛÛÛÛÛÛÛÛÛÛÛÛÛÛÛÛÛÛ ÛÛÛÛÛÛÛÛÛÛÛÛÛÛÛÛÛÛÛÛÛÛÛÛÛÛÛÛÛÛÛ||
||ÛÛÛÛÛÛÛÛÛÛÛÛÛÛÛÛÛÛÛÛÛÛÛ ÛÛÛÛÛÛÛÛÛÛÛÛÛÛÛÛÛÛÛÛÛÛÛ||
||ÛÛÛÛÛÛÛÛÛÛÛÛÛÛÛ ÛÛÛÛÛÛÛÛÛÛÛÛÛÛÛÛÛÛ||
||ÛÛÛÛÛÛÛÛÛÛÛ ÛÛÛÛÛÛÛÛÛÛÛ||
||ÛÛÛÛÛÛÛ ÛÛÛÛÛÛÛ||
||ÛÛÛÛ ÛÛÛÛ||
||ÛÛ ÛÛ||
||Û \ / Û||
| ________________________/\ Uberizer v1.7 /\_______________________ |
.' / \ '.
| /T=---------------------------------=T=---------------------------------=T\ |
|| | .RLS.Date. : 21/OKT/2013 | ..Language.. : English | ||
|| | ....OS.... : WinALL | .Protection. : Does not apply | ||
|| | ...Type... : Android Manager | ...Hacker... : HcH | ||
| \I=---------------------------------=I=---------------------------------=I/ |
[ ] [ ]
/ \
| INFO: |
|| Uberizer is a tool to manage Android devices: ||
|| connect, backup, control, debug, unlock full play store, mod, optimize, ||
|| personalise, root, monitor, improve, and many more features! In total, ||
|| Uberizer offers 176 functions to mod/hack/optimize Android devices and ||
|| even Android apps! ||
| \ / |
[ ] [ ]
/ \
| |
| |
: :
:: ::
'" __________________________________________________ ___________<CRAPASCII> '"
]| / \ |[
||/ \||
|/ \|
: :
Quote:
|
Uberizer v1.7 by HcH [www.TechKnow.me]
The Uberizer aims to support many android devices. Use the Uberizer to: * connect * improve * backup * control * debug * unlock full play store * mod * optimize * personalise * root * and more! Uberizer Quickstart Guide: Connecting your device to your computer: To get started using the Uberizer you will need to connect to your computer. This can be done 2 ways: * Wireless (RECOMMENDED) (REQUIRES ROOT!) * Wired (Advanced users only) (This method can ROOT devices which aren't rooted) The reason why wireless is recommend is because it's easy! Wired installation requires you to install the ADB driver which can sometimes have problems, some devices have wierd ADB ports so you will have problems finding the proper cable for it and some devices don't have ADB ports at all. ** Setting up your device for Wireless Uberizing (RECOMMENDED) 1. Go to the Wireless Menu (w) 2. Enable Wireless ADB using ONE of these options: 2, 4 or 5, whichever is most easy for your situation. 3. If you use an app (4 or 5), start the app on your Android device. Use option 6 to connect to the given IP in the app. If you chose option 2, you must find your device IP, go to Settings, About device, Status, to see the IP. ** Setting up your device for Wired Uberizing (Advanced users only) 1. Install ADB drivers (from dir usb_driver) for wired ADB 2. Boot Android, connect device (on the device, the statusbar will display "usb debugging mode is activated") 3. Run this tool, analyse device so this tool can seek info of your device and will check if your model is supported by mods NOTE: Your device must have "ADB Debugging" checked in: "Settings \ Developer options \ USB debugging (Debug mode when USB is connected)" download from here :Uberizer_v1.7_21OCT2013_Setup_[www.TechKnow.me]-HcH |
Uberizer main menu overview:
a. Analyse / detect device
b. Build Menu
c. Root Menu
d. Backup Menu
e. Bootanimation Menu
f. Multi Mod Tool Menu
g. Application Manager Menu
h. Help me
i. AllWinner Firmware Menu
j. Google Play Store Menu
k. Various Menu
l. Files to SD
m. Donate to TechKnow
o. Open Uberizer directory
p. WiKey, PC Keyboard to Android Device
q. Quit
r. Reboot device
s. System analyzer
t. Install TechKnow ToolKit to device
u. Update Uberizer
w. Wireless Uberizer mode
x. Install Virtual OldPC 95 to device
z. ZDiR
Uberizer main menu details:
a. Analyse device (find model)
- Rescans for a device, use this after connecting another android device to your computer.
b. Build Menu
+ 1.Auto Mod build.prop
* Automatically adds several build.prop tweaks and enhancements.
+ 2.Edit build.prop and push it back
* A handy way to quickly check or edit a few build properties.
+ 3.Market build.prop fixes
* Strips out the current market fingerprint and copies the modded build.prop to the
device. Currently this emulates a Samsung for full market (Google Play) access.
+ 4.Backup current build.prop on device
* Dumps a copy of your build.prop to \backups, the prop dump name includes your model
name, the current date and time of dump. To easily restore these backups, run 5.
+ 5.Restore a build.prop backup
* Indexes all backupped build.prop files on the system and allows the user to chose
which file (s)he wants to restore on the tablet.
Code:
c. Root Menu
 + 1.Android 1.6 Donut (tested on WM8505)
 + 2.Android 1.6 Donut MAA (tested on WM8505)
 + 3.Android 2.2 Froyo (WM8650)
 + 4.Android 2.3 GingerBread (WM8710)
 + 5.Android 3.0 HoneyComb
 + 6.Android 4.0 ICS (tested on A13)
 + 7.Android 4.0 ICS MIPS (tested on Ainovo)
 + 8.Android 4.0 ICS WM8850/RK3066/google_sdk
 + 9.Android 4.0 ICS v2
 + 10.Android 4.0 ICS HTC
 + 11.Android 4.0.X ICS X86
 + 12.Backup current root bin and su app
    * Backups the system\(x/s)bin\su bins and superuser.apk to \backups\system (x/s)bin and \app
 + 13.Restore root backup
    * Writes the \backups su bins and superuser.apk back to the device.
 + 14.Unroots device
    * Removes su bins and superuser from device and sets default back.
 + 15.Check device root
    * Installs and starts the latest free version of Joey Krim's Root Checker
 + 16.HcH's Brute-Root v1 (recommended) 2.x-4.x
    * Tries to enforce a write-able FS so SU can be copied to it, works on most chinese tablets.
 + 17.HcH's Brute-Root v2 (only when v1 fails)
     -Roots almost every device (HTC/LG/SAMSUNG/A20)
     -Reboots your device twice for this procedure
     -Safe root, it should not be risky to use this tool
     -No busybox installation
     -Superuser bin and app v3.1.3
 + 18.WM8880 Root
      HcH's trick to get SuperSU properly working on a WM8880:
      Instructions:
      1. Enable ADB in settings \ developer options \ USB debugging
      2. Enable SU in settings \ Superuser setting \ Always allow
      3. Connect device to your PC and install the driver from Uberizer\usb_drivers
      4. Follow the procedure
      5. Run SuperSU once manually, upgrade the bin, and it should be fine!
      6. Test it using TechKnow ToolKit
 + 19.Root Upgrade submenu
     1. Root backup
        Backups the current superuser and su bins on your device to changer_files\system
     2. Root restore (only required if failed)
         Restores backed up root files done with option 1. It does not  write back symlinks however so you may need to manually link the bins  together on the FS.
     3. Enable ADB Root Mode
        Tries to get full access to a device using adb root
     4. Enable ADB Remount Mode
        Tries to get full access to a device using adb remount
     5. Remount RootFS
        Tries to get full access to a device using remount command
     5a.Remount RootFS busybox mode
        Tries to get full access to a device using remount command
     6. Remount System
        Tries to get full access to a device using remount system command
     6a.Remount System busybox mode
        Tries to get full access to a device using remount system command
     7. SuperSU-v1.65
        SuperSU of Chainfire v1.65 including NoNag and SuperSU bins
     8. Superuser-3.1.3-arm
        SuperSU of Androidsu v3.1.3
     9. Superuser-3.1.3-x86
        SuperSU of Androidsu v3.1.3
    10. Superuser-3.2-RC3-arm
        SuperSU of Androidsu v3.1.3
    11. Superuser-3.2-RC3-x86
        SuperSU of Androidsu v3.1.3
     r. RESET ADB
        When you get "error: device not found" hit "r" to RESET ADB then try another way to get more access to your device.
     h. ROOT HELP
        Short Help Me for Using the Uberizer to root devices.

        The recommended first try you attempt to get root is Brute-Root v1, it's safe
        and should not harm your device. However you may run into error such as:
        "adbd cannot run as root in production builds" when it tries to to get access.

        If you already have root and just wish to update your superuser app
        and superuser bin you can use the Root Upgrade submenu. These procedures try
        to just write certain nice root apps and bins combinations.

        Making a backup is always most wise Always do so BEFORE you start modding.
        Option 1. dumps all the bins and apps it can find on your device to your pc,
        if no error occurs on the screen. Option 2. restores whatever you have backed
        up using option 1. It does not write back symlinks however so you may need
        to manually link the bins together on the FS.

        If you try to upgrade root and it fails, you can try options 3. to 6a. to get
        access to the devices FS. After you have input one of these options just retry
        the last procedure that has failed and it very well could succeed after one of
        of these commands. When you get "error: device not found" hit "r" to RESET ADB
        then try another way to get more access to your device.

 d. Backup Menu
 + 0.Full device "unmod" backup to backups\%MODEL%_%DATE%_%TIME%
   * Creates a set of files that the uberizer tries to mod on your android device.
 + 1.Backup build.prop to backups\
   * Dumps a copy of your build.prop to \backups, the prop dump name includes your model
     name, the current date and time of dump. To easily restore these backups, run 5.
 + 2.Restore build.prop
   * Indexes all backupped build.prop files on the system and allows the user to chose
     which file (s)he wants to restore on the tablet.
 + 3.Backup bootanimation.zip to backups\
   * Dumps a copy of your bootanimation to backups\bootanimation.zip
 + 4.Restore bootanimation.zip
   * Displays a selection menu of bootanimation.zips from \backups and pushes the animation to your android device.
 + 5.Backup data\ to backups\data.tgz
   * REQ ROOT. This will backup your full /data partition, very nice to backup all your
     downloaded apps with their settings if you are planning to reflash your device.
 + 6.Backup data\app to backups\data_app.tgz
   * REQ ROOT. This will backup only data\data\apps, your "downloaded" apps. Very useful
     for sharing apps with your friends or when you are planning to reflash your device.
 + 7.Backup data\data 2 backups\data_data.tgz
   * REQ ROOT. This will backup only all the app settings on your device.
 + 8.Restore 5. data.tgz backup
   * Easily restore backups done with option 5.
 + 9.Restore 6. data_app.tgz backup
   * Easily restore backups done with option 6.
 + 10.Restore 7. data_data.tgz backup
   * Easily restore backups done with option 7.
 + 11.Backup current root bins and su app
    * Backups the system\(x/s)bin\su bins and superuser.apk to \backups\system (x/s)bin and \app.
 + 12.Restore backed up root bins and su app
    * Writes the \backups su bins and superuser.apk back to the device.
 + 13.Backup hosts file
    * Backups your current hosts file of your device to backups\hosts_%date%_%time%.
 + 14.Restore hosts file
    * Easily restore a previously backupped hosts file.
 + 15.Backup init files to backups\init.tgz
    * This will take all init rc files from your device and stores them into \backups seperately,
      but also this will make a tgz of the original files. This tgz is easy to recover using
      option 16, because it's a tgz the original attributes remain. You can mod the seperately
      dumped init files and adb shell chmod 750 them when you push them back.
 + 16.Restore init files backups\init.tgz
    * Brings up a selection menu to easily select your previously created init backup.

 e. Bootanimation Menu
 + 1.Backup current bootanimation.zip
   * Dumps a copy of your bootanimation to backups\bootanimation.zip.
 + 2.Copy new bootanimation.zip
   * Write back backups\bootanimation.zip to your android device.
 + 3.Delete bootanimation.zip on device
   * This removes the bootanimation.zip from your device, this might slightly improve your
     boot time.
 + 4.Recover backed up bootanimation.zip
   * Brings up a selection menu with current backed up bootanimation.zip files in \backups.

 f. Multi Mod Tool Menu
 + 1.undex (baksmali)
   * Undex amm_files\undex_input_files\classes.dex to undex_output_files.
 + 2.dex (smali)
   * Rebuilts dex from \dex_input_files and writes to dex_output_files.
 + 2a.dex (smali) dex default undex output dir
   * Rebuilts dex from \undex_output_files\out and writes to \dex_output_files.
 + 3.Jar maker
   * Creates one .jar file from \jarmaker_input_files dir, a generated .jar file will appear in jarmaker_output_files.
 + 3a.Jar maker using existing meta-inf\manifest.mf
    * Creates one .jar file from \jarmaker_input_files dir, a generated  .jar file will appear in jarmaker_output_files with manifest.mf.
 + 4.APK sign (batch-mode)
    * HcH's Microsigner, a simple way to sign a load of apks from  \amm_files\apksign_input_files\ to \amm_files\apksign_output_files\.
 + 5.Update.zip maker
   * Creates simple update.zip file. Input dir \updatezip_input_files, Output zip file will be written in \updatezip_input_files
 + 6.Jarsigner
   * A tool to sign jar files, certs/keys included! Input file: \amm_files\jarsigner_input_files\unsigned.jar
 + 7.OptiPNG
   * Optimize those PNG files for maximum loading speeds! Dump all your pngs in optipng_files and run this option.
 + 8.framework-res.apk OptiPNG (alpha)
   * A attempt to automatically optimize a framework-res.apk. This rebuilts the framework and signs it.
 + 9.batch extract and decrypt manifest from apks in \aapt_input_files
 + 10.batch generate APK application details from apks in \aapt_input_files
 + 11.batch generate APK extreme details from apks in \aapt_input_files
 + 12.Update.zip signer, signs amm_files\updatezip_input_files\ zip files, warning, do not use spaces in the filenames.
 + 13.ZIP align (batch-mode), aligns all zips in amm_files\zipalign_input_files\

 g. Application Manager Menu
 + 1.Batch install apps (from \install_apk)
   * This installs all the apk files you have stored in \install_apk on your device.
 + 2.Install1app (select from \install_apk)
    * This brings up a selection menu of all the apk files you have stored  in \install_apk on your device. You can select one you want to install.
 + 3.Backup system apps to backups\sysappstgz
   * Backups the system apps of your device to backups \system_apps.tgz
 + 4.Backup data apps to backups\data_appstgz
   * Backups the data apps of your device to backups \data_apps.tgz
 + 5.Restore 4. data apps package to device
   * This easily restores a previously created backup with option 4
 + 6.Backup 1 app to backup\ .apk
   * Creates a list of all your downloaded apps, enter the generated number of the app
     you wish to backup, and the app will be downloaded to \backups.
 + 7.System App Remover (with auto backup)
   * Makes a list of all the system apps with numbers, input the prefixed number and
     the system app will be automatically backed up to /backups/%APKNAME%_%DATE%_%TIME%
 + 8.System App Restore
   * With this option you can restore previously removed system apps.

 h. Help me
   Connecting Wireless/Driverless (ROOT REQUIRED!):
   1.Go to the Wireless Menu (w)
   2.Enable Wireless ADB using ONE of these options: 2, 4 or 5, whichever is most easy for your situation.
   3.If you use an app (4 or 5), start the app on your Android device.
     Use option 6 to connect to the given IP in the app.
     If you chose option 2, you must find your device IP, go to Settings, About device, Status, to see the IP.

   Connecting Wired/Driver:
   1.Install ADB drivers (from dir usb_driver) for wired ADB
   2.Boot Android, connect device (on the device, the statusbar will display "usb debugging mode is activated")
   3.Run this tool, analyse device so this tool can seek info of your device
     and will check if your model is supported by mods

 i. AllWinner Firmware Menu
 + 1.IMG unpacker
   * unpacks rom_kitchen\original.img, the main files are stored in _input.
 + 2.IMG packer (rom_kitchen\_input)
   * rebuilts your modded files that are previously extracted to a IMG file (output.img)
 + 3.Dump A1X firmware to Uberizer dir
   * this will dump your A10 or A13 firmware in a sub directory of Uberizer.
 + 4.Restore A1X firmware from \rom_dumps
      Restore a previously created rom dump with option 3. Special Thanks  to Satcomranger for risking his tablet's life and coding fixes for the  procedure.
 + 5.Start LiveSuit Pack v1.11
     Start LiveSuit for manual flashing or formatting your A10/A13 device
 + 6.Alternative IMG unpacker (by RedScorpio)
     Brings up a IMG selection MENU that lists all IMG files in uberizer\rom_kitchen\_input for extraction.
      The unpacked ROM will be stored in  \rom_kitchen\_input\%ROMNAME%.DUMP\*, edit / modify the data, leave it  in this directory!
     Then run option 7 to repack it!
 + 7.Alternateive IMG repacker (by RedScorpio)
     Brings up a selection MENU for .DUMP directories, select a number to rebuild the IMG from this directory.
     If the original IMG file still exists while you're making the new ROM it will be renamed to .bak. A IMG file with the same
     name as the directory will be output in: \rom_kitchen\_input\
 + 8.Dump script.bin (to uberizer root dir)
      This command remounts the boot fs so it can pull the script bin from  your device. The script bin contains valuable information about  touchscreen and other hardware specs. This procedure is recommended  before flashing A10 or A13 devices.
 + 9.Convert script.bin to script.fex
     Converts the dumped script.bin into a fex file so you can edit it.
 + 10.Edit script.fex
     Brings up WinVi32 and let's you modify the converted bin fex file.
 + 11.Script.fex to bin converter
     Before you can use the modified bin you need to convert it back into a bin file with this command.
 + 12.Push converted script.bin to device
     Writes back the modified script.bin to your device, reboot and the effects should be active.

 j. Google Play Store Menu
 + 1.Install Normal Mode
    Deploys Google Play Store version 4.3.11 to device without any form of remount/root request.
 + 2.Install Remount Mode
     Deploys Google Play Store version 4.3.11 to device with adb remount  for write access. Use this option when a normal install fails.
 + 3.Install Root Mode
     Deploys Google Play Store version 4.3.11 to device with adb root for  write access. Some distros require you to write the new Play Store this  way. Use this option when a normal install fails.
 + 4.Fake Nexus10 build for full access
     Makes a backup of your current build.prop file to  %UBERIZERDIR%\backups\ and modifies the build.prop on the device to  emulate a Nexus 10 in order to get full play store access unlocked. This  procedure also automatically clears out the Google Services Framework  Data and Google Play Store cache.
 + 5.Clear Market Cache
    This procedure also automatically clears out the Google Services Framework Data and Google Play Store cache.

 k. Various Mods Menu
 + 1. Sync device FS
   * syncs android device's FS, for safe shutdown for example.
 + 2. Clean Dalvic Cache
   * cleans the dalvic cache
 + 3. Add Tar 1.23 bin (auto backups old)
   * this adds the real deal TAR binary to your android device!
 + 4. Install anti ad and malware hosts file
   * adds the MVPS hosts file to protect you against the most known malware servers.
 + 5. Add GREP/EGREP/FGREP 2.6 bins
   * adds the GREP binaries to your android device, enjoy full grep functionality!
 + 6. Add PHP v5.3.2 and Groomdroid webserver
   * copies needed files and installs a PHP pre-configured Groomdroid web server.
 + 7. ICS Screen Capture to /screenshots
   * takes a screenshot of your screen and stores it in /screenshots
 + 8. Add Capture ICS bin to device
   * adds the ICS capture bin to your device, EXPERIMENTAL FEATURE . UNTESTED
 + 9. Add bash 4.1 bin to device
   * for those Shell Ninjas out there, here it is ... BASH 4.1 on android!
 + 10. Config Groomdroid on device
   * easily edit your config.
 + 11. Market and Framework Cache clean
   * performs the "market flush" for you.
 + 12. Clean dalvik-cache
     Deletes everything in the dalvik-cache, reboot is required after this procedure, so
     the system can rebuilt the cache on boot.
 + 13. HcH's Android Lock Crusher
   * HcH's Lock Crusher will remove passwords, lockscreen and locks from Android devices,
     it will attempt to get the best access to a connected device and tries to remove them
     all, but not before making backups of the files that are deleted in this procedure to
     \backups.
 + 14. Remove Phone (with auto backup)
   * This option will remove phone.apk and TelephonyProvider.apk from /system, without
     any extra switches this will backup the removed items.
 + 15. Realtime LOGCAT Monitor 1024x768
   * Starts a new command prompt window fit for 1024x768 resolution.
 + 16. Dump LOGCAT to TXT file
   * Dumps the LOGCAT output as a TXT file in the Uberizer dir. After the dump has
     completed, WinVi editor will open the generated TXT file.
     Output file example: LOGCAT_npm702_NOVO7PALADIN_20122511_0202.txt
 + 17. Generate full device and bug report
   * Dumps dumpsys, dumpstate, and logcat to a TXT file in the Uberizer dir. After
     the dump has completed, WinVi editor will open the generated TXT file.
     Output file example: BUGREPORT_npm702_NOVO7PALADIN_20122511_0205.txt
     NOTE: This dump can take quite a while. If your device has vibration it will go
     off once at the start of the dump and will go off twice when it's completed.
     This dump can take up to one minute to complete.
 + 18. Dump DMESG (Diagnostic messages) to TXT
   * Dumps out of DMESG in the Uberizer dir and opens the output file in WinVi,
     Output file example: DMESG_npm702_NOVO7PALADIN_20122511_0234.txt
 + 19. Fix /data/local permissions
   * Needed on some ICS roms when ADB installation fails.
 + 20. Backup and remove batterystats.bin
   * Handy for re-calibrating your battery. Batterystats is file that actually follow
     the usage of power by android apps. However, some problems conserning calibration
     and indication can relate to this file.
 + 21. Backup and remove Unlock Pattern
     Simply removes the settings.db so you can use your device again.
 + 22. Enter device's ADB shell
     For all the shell ninja's out there
 + 23. Enter device's ADB shell (remountmode)
     This remounts data system and root to be read write, consider this option as
     browsing under root privileges, be careful what you mod! After you have closed
     this shell session, the remounts remain active in the adb session. In other words
     if you have problems modding your build prop for example, run this option, close it
     and retry, good chance you can now edit system files.
 + 24. Edit init.rc and push back
     For pro's only, allows you to modify your init.rc and copy the modified init.rc back
     to your device. Handy for developers who are debugging.
 + 25. Edit init.%MODEL%.rc and push back
     For pro's only, allows you to modify your init.rc and copy the modified init.rc back
     to your device. Handy for developers who are debugging and people who have problems
     with touch screen or gsensor on sun5i / a13 models to swap drivers.

 l. Files to SD (extsd)
 + This will write files from \files_to_sd to your device /mnt/extsd or /sdcard

 m. Donate to TechKnow
 + How very kind of you to consider!

 u. Update Uberizer
 + Connects to TechKnow and downloads the latest version, and installs it over itself.

 q. Quit
 + A very common command that should not require explanation. However, quitting the
   Uberizer cleans up it's temporary files and shut downs the adb server properly.

 r. Reboot device
 + While your device is connected you can reboot it to see if certain mods are accepted
   or other testing purposes. Uberizer will play pong with itself until your ADB is back online.

 s. System analyzer
 +  Analyzes connect Android devices and give a true load of information  about anything like processor, ram, memory, storage, modules. Dumps a  text file in the Uberizer root directory with all your device's system  specs.

 t. Install TechKnow ToolKit to device
 + TechKnow ToolKit Features v2.0:
   * WM8505 Analyzer
   * A10 / A13 Dump Firmware to SD
   * A10 / A13 Pull and Push script.bin
   * Shutdown
   * Reboot
   * Reboot into Recovery
   * Hidden feature
   * Wireless Uberizer / ADB control panel
   * LogCat viewer (plus write log to SD function)
   * Error LogCat viewer (plus write log to SD function)
   * Root Check
   * BusyBox Check
   * Analyser
   * WM Analyser
   * Remount FS RW
   * IP Config

   TechKnow ToolKit Function overview:
 + Wireless Uberizer / ADB control panel
    Enjoy the wonders of wifi running driverless ADB to your computer.  This way, you can also use the Uberizer Wireless to manage your device!  (root is required for this function)
 + WM8505 Analyzer
   Before  you flash your WM8505 be sure to run this tool! It will save essential  recovery information in the case you flash the wrong ROM! With some  extra command and the created text file by this function you can easily  fix your non function touch screen, no sound and crashes on the camera  for example!
 + A10 / A13 Dump Firmware to SD
   Before you flash  any A1X device, it is most wise to make a backup of your current  firmware. The bootloader, recovery, system, etc will be written to your  SD card, make sure you have one present at the time of dumping!
 + Shutdown, Reboot and Reboot into Recovery
    On the MK802 and the MK808 we don't have a nice shutdown function.  This results in losing data after a reboot due the FS didn't synchronize  when you powered off. Apps can get lost and data will be lost when you  disconnect the power. These functions safely sync the FS and try to  shutdown your device. Root access is required.
 + A10 / A13 Pull and Push script.bin
    The script.bin file of the A1X models contains essential information  of your device's configuration. With this function, you can very easily  recover from a bad flash in most cases. Make sure you run this command  before you write the new firmware!
 + LogCat viewer (plus write log to SD function)
    Easily view your logcat for debugging problems. This option also  offers you to dump the logcat output to your SD for further  investigation on your desktop or to post the logcat output on TechKnow  so the TechKnow Technicians can investigate your problem with all the  required details.
 + Hidden Feature
   I'm sure you'll quit looking for it.
 + Root Check
    Simply asks superuser permissions, real handy to have when you're  developing a ROM or when you are trying to root your device using the  Uberizer to test superuser permissions. This also outputs the error on  the su command.
 + BusyBox Check
   We can not live without  BusyBox, it will expand your device functionality greatly and it's  required for some apps, such as the TechKnow ToolKit. This command  simply checks if a busybox bin is present, then it displays what version  is available. However, do note that this output does not mean busybox  is properly installed. Some devices require you to execute "busybox  --install" to get in the system, be warned however, there are reports of  members losing root access by installing busybox. Busybox carries it's  own su binaries which could overwrite the ones your firmware require!
 + Analyzer
    Generating a device report was never this easy! This option also  offers the user to write the report to SD, so the user can post the  analyser output for specifications when requesting help/firmware etc.  Details include: cpu info, partition info, build.prop and much more! NEW  in v2.0: Extended partition/FS/module info.
 + WM Analyzer
   A  must have for anyone thinking of installing a Universal WonderMedia  Uberoid version. This functions allows you to save the essential  parameters of your device and for 8850's it will tell which FWC (model)  you will need to flash! Always write the output of the WM Analyser to  your SD BEFORE installing Uberoid will ensure you won't have problems  that can not be fixed after flashing.
 + Remount FS RW
   Devices  such as the 8850 have the system set to RO, this is due security  measures which are fine. However, sometimes you will need to remount the  FS RW so you can edit some files. This function tries to remount your  system, it works on my devices but it's possible this function will not  work on all devices.
 + IP Config
   Shows your IP easily without having to go to all those menus.

 w. Wireless Menu
 + 1. Help and HowTo
   * Short intro and HowTo on connecting your device
 + 2. Enable Wireless ADB through wired ADB
   * When you are already ADB connected, you can start Wireless mode
 + 3. Disable Wireless ADB
   * Wired or wireless, disables Wireless ADB server
 + 4. Wired install of Wireless ADB APP
   * Install a ADB APP of choice to your device (2 loaded)
 + 5. Copy Wireless ADB APP to SD
   * Prepare a SD card for the Uberizer
 + 6. Connect
   * Connect your device to your computer/uberizer to use it. Your IP-address and you can specify
     if desired a custom port, default port = 5555, leave the default port empty to use 5555.

 x. Install Virtual OldPC 95 to device
 + This will copy the oldpc95 hd image with dos6.22, win2.3, win3.11 and win95, with 17 small games.
   Run this image using the slightly modified aDosBox that will be installed with this command. To
   enhance the screen quality, go to menu, sdl settings, video settings and select smooth the video.
   A reboot is required, if your device is powerful enough you will have no delays. To start Win3.11
   or 2.1 or Dos 6.22, on booting the dosbox image hit F5 and select option 5 from the boot menu, or
   exit windows to command prompt in the shutdown menu. Run "autoexec" once you are in the prompt and
   a helpful menu with the games will appear.
Infinity-Box CDMA-Tool v1.96 released Alcatel C-131 Supported
♠ Posted by ggg in All box setup file
Infinity-Box CDMA-Tool v1.96 released
.Alcatel-C131 version B03 30-May-2013 supported
Download software from Official support area:
.Alcatel-C131 version B03 30-May-2013 supported
Download software from Official support area:
♠ Posted by ggg in All box setup file
Octoplus/Octopus Suite v1.2.5 Release Notes
- Credits consumption changed! From now on, Unlock and Repair IMEI of Sony devices
for SE Unlimited Activation owners will cost only 4 credits! - Improved Unlock operation for Sony Xperia ST26a and Sony Xperia ST26i.

Octoplus/Octopus Suite v1.2.5 is out!
Octoplus/Octopus Team as always is on the guard of its users demands, satisfying as
many of them as possible, so here it is - new, hot and fresh version of Suite Software!
Octoplus/Octopus Suite v1.2.5 Release Notes
- Credits consumption changed! From now on, Unlock and Repair IMEI of Sony devices
for SE Unlimited Activation owners will cost only 4 credits! - Improved Unlock operation for Sony Xperia ST26a and Sony Xperia ST26i.
Download Octoplus/Octopus Suite v1.2.5
- Credits consumption changed! From now on, Unlock and Repair IMEI of Sony devices
Micromax P362 Tab Flash Success[Google Lock,User Lock,Pattern Lock Remove Done] Free Flash File
♠ Posted by ggg in Micromax
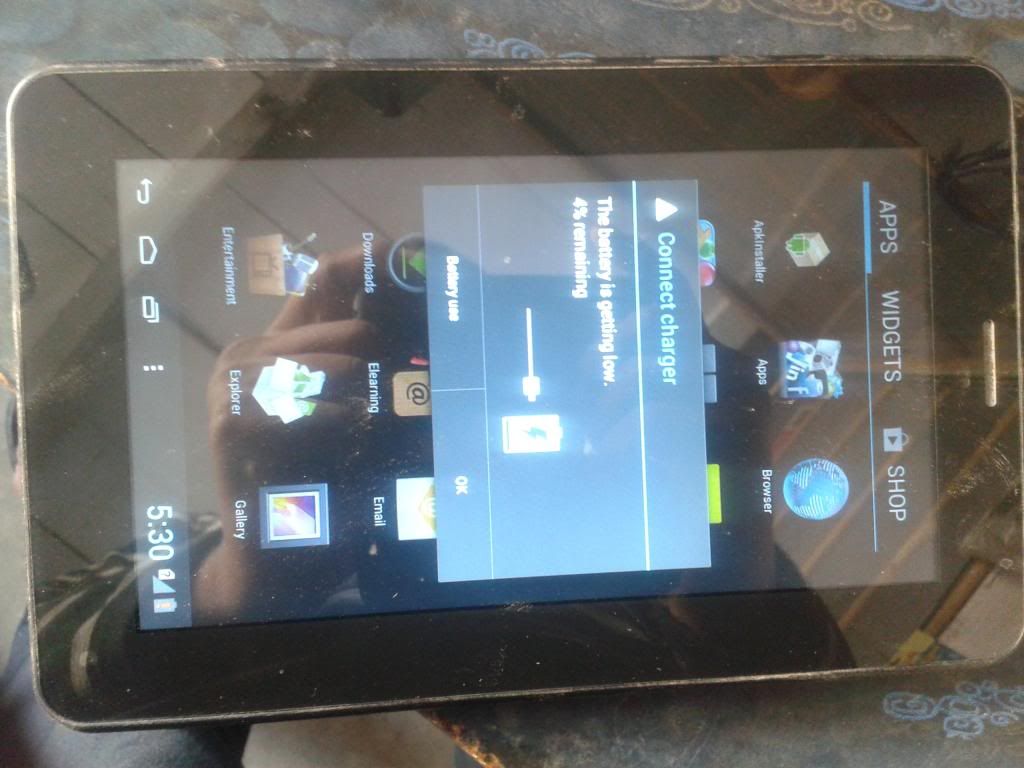
Micromax P362 Tab Flash Success[Google Lock,User Lock,Pattern Lock Remove Done]
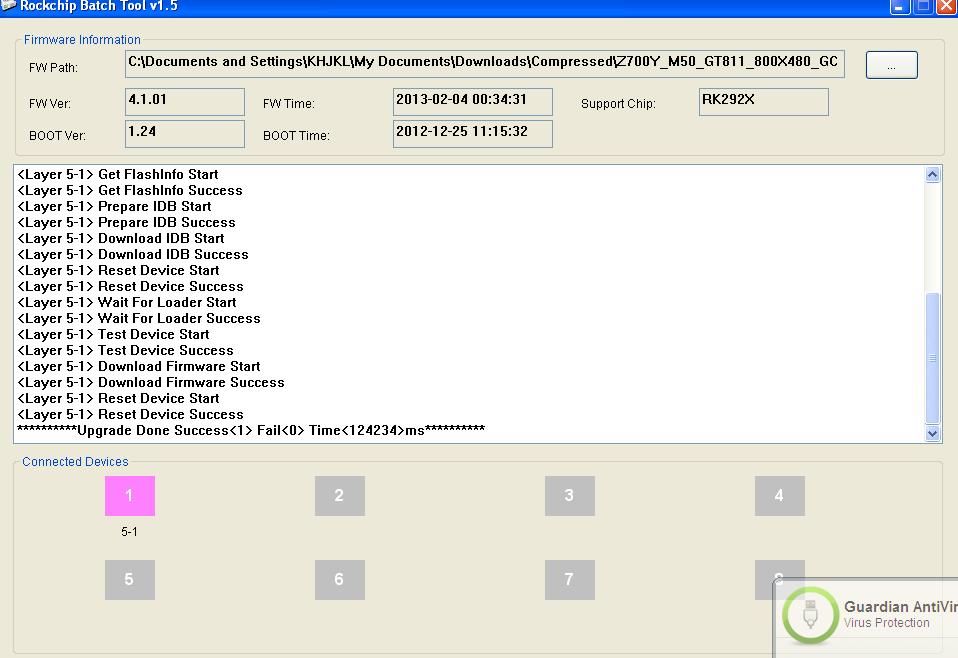

Firmware :
Z700Y_M50_GT811_800X480_GC0308_GC2035@P362_MICROMAX_EN_V20130204.0034.html
P362_MICROMAX_EN_V20130313.1419.html
Z700Y_M50_GT811_800X480_GC0308_GC2035@P362_MICROMAX_EN_V20130515.1745.html
Firmware :
Z700Y_M50_GT811_800X480_GC0308_GC2035@P362_MICROMAX_EN_V20130204.0034.html
P362_MICROMAX_EN_V20130313.1419.html
Z700Y_M50_GT811_800X480_GC0308_GC2035@P362_MICROMAX_EN_V20130515.1745.html
HowTo Flash a10 using LiveSuite ? NXG Xtab A10 Hard Reset DONE
♠ Posted by ggg
1. Requirements:
(1) Windows PC
(2) USB Cable
(3) Upgrade tool (LiveSuit.exe)
(4) Firmware image file
(5) Windows USB drivers
2.Upgrade Steps:
(1) Unzip the upgrade tool and USB drive to your hard driver
Double-click the LiveSuitPack10x_english.exe file, it will automatically install the driver files. Click "OK" to complete the driver installation.
(2) Open LiveSuit.exe
Double-click to open the upgrade tool LiveSuit.exe
(3) Select the firmware
Click the "SelectImg" button (the first button from the left) to select the firmware .img file.
(4) Turn off your tablet
(5) Press the key combination to start it in the upgrade mode
a. Press the "Vol -" key, then press the "Power" button, hold two buttons at the same time
b. Connect the USB cable to tablet and computer
c. After connecting the USB cable, press the power button 6 times quickly or hold the "Vol -" keys and the "Power" button for more than 6 seconds (you should get a pop up window if done correctly , if not repeat step 5 from beginning)
d. DON'T release the "Vol -" button till the LiveSuit window pops up
e. You can now release the "Vol -" button
(Note: If you install the driver at this time the pop-up dialog box, the path to point to installation directory UsbDriver LiveSuit folder, click Next to complete the driver installation prompts).
You should see LiveSuit window pops up; otherwise, you didn't do it correctly, you have to repeat step 4 and 5.
(6) Select the format to force upgrade
Livesuit prompt "force format", click "Yes" (Y). All of the original apps installed will be removed.We highly recommend mandatory format! ! ! Otherwise the update is not complete and may brick! ! !
(7) Upgrade begins
Pop-up "OK to force format" dialog box, select "Yes", the upgrade begins.
(8) The upgrade is complete
Firmware download process last about three and a half minutes or so, please wait until the prompt "upgrade successful."
(9) Automatic restart
After the upgrade is complete, your tablet will automatically restart, then you can unplug the USB cable.
Slow start-up for the first time, please be patient.
If the machine does not restart automatically, press and hold the Power button for 8-10 seconds or more to ensure the power switch off, then press the Power button 3 seconds or more to turn on your tablet.
(10) Congratulations! You have flashed the firmware.
NXG Xtab A10 with OG flash file&tool

Firmware link#
NXG_Xtab_A10_StockROM_ICS_4.0.3_
NXG_Xtab_A10_StockROM_ICS_4.0.3_1st_April_2012
Flash tool link#
A10_Lve Suit
A10_LiveSuitPack_version_1.09_20111101
Drivers link#
ABD Drivers
ADBDrivers
ReadMore>>>iOS 7.0.4 Release iPhone iOS Update !! Free Download
(1) Windows PC
(2) USB Cable
(3) Upgrade tool (LiveSuit.exe)
(4) Firmware image file
(5) Windows USB drivers
2.Upgrade Steps:
(1) Unzip the upgrade tool and USB drive to your hard driver
Double-click the LiveSuitPack10x_english.exe file, it will automatically install the driver files. Click "OK" to complete the driver installation.
(2) Open LiveSuit.exe
Double-click to open the upgrade tool LiveSuit.exe
(3) Select the firmware
Click the "SelectImg" button (the first button from the left) to select the firmware .img file.
(4) Turn off your tablet
(5) Press the key combination to start it in the upgrade mode
a. Press the "Vol -" key, then press the "Power" button, hold two buttons at the same time
b. Connect the USB cable to tablet and computer
c. After connecting the USB cable, press the power button 6 times quickly or hold the "Vol -" keys and the "Power" button for more than 6 seconds (you should get a pop up window if done correctly , if not repeat step 5 from beginning)
d. DON'T release the "Vol -" button till the LiveSuit window pops up
e. You can now release the "Vol -" button
(Note: If you install the driver at this time the pop-up dialog box, the path to point to installation directory UsbDriver LiveSuit folder, click Next to complete the driver installation prompts).
You should see LiveSuit window pops up; otherwise, you didn't do it correctly, you have to repeat step 4 and 5.
(6) Select the format to force upgrade
Livesuit prompt "force format", click "Yes" (Y). All of the original apps installed will be removed.We highly recommend mandatory format! ! ! Otherwise the update is not complete and may brick! ! !
(7) Upgrade begins
Pop-up "OK to force format" dialog box, select "Yes", the upgrade begins.
(8) The upgrade is complete
Firmware download process last about three and a half minutes or so, please wait until the prompt "upgrade successful."
(9) Automatic restart
After the upgrade is complete, your tablet will automatically restart, then you can unplug the USB cable.
Slow start-up for the first time, please be patient.
If the machine does not restart automatically, press and hold the Power button for 8-10 seconds or more to ensure the power switch off, then press the Power button 3 seconds or more to turn on your tablet.
(10) Congratulations! You have flashed the firmware.
NXG Xtab A10 with OG flash file&tool
Firmware link#
NXG_Xtab_A10_StockROM_ICS_4.0.3_
NXG_Xtab_A10_StockROM_ICS_4.0.3_1st_April_2012
Flash tool link#
A10_Lve Suit
A10_LiveSuitPack_version_1.09_20111101
Drivers link#
ABD Drivers
ADBDrivers
ReadMore>>>iOS 7.0.4 Release iPhone iOS Update !! Free Download

N9005 multi package arabic firmware 4.3
♠ Posted by ggg in Samsung andriod full arabic firmwares
N9005 multi package arabic firmware 4.3
CSB_signed_HLTE_EUR_OPEN_32G_0718.pit
BL_N9005XXUBMH1_1287056_REV03_user_mid_noship_MULT I_CERT.zip
AP_N9005XXUBMH1_1287056_REV03_user_mid_noship_MULT I_CERT.zip
CP_N9005XXUBMH1_REV03_CL1242493.zip
CSC English
CSC_OXX_N9005OXXBMH1_1313042_REV03_user_low_ship_M ULTI_CERT.zip
CSC Arabic
CSC_OJV_N9005OJVBMI2_1581544_REV03_user_low_ship_M ULTI_CERT.zip
i9105P multi package arabic firmware 4.1.2
♠ Posted by ggg in Samsung andriod full arabic firmwares
i9105P multi package arabic firmware 4.1.2
s2vep.pit
DefaultCalDataWithBoot_I9105PXXAMB3_REV05.zip
CODE_I9105PXXAMB9_955508_REV05_user_low_ship.zip
MODEM_I9105PXXAMB3_REV05.zip
CSC_OXA_I9105POXAAMB1_955508_REV05_user_low_ship.z ip
s2vep.pit
DefaultCalDataWithBoot_I9105PXXAMB3_REV05.zip
CODE_I9105PXXAMB9_955508_REV05_user_low_ship.zip
MODEM_I9105PXXAMB3_REV05.zip
CSC_OXA_I9105POXAAMB1_955508_REV05_user_low_ship.z ip
n7105 multipakage arabic firmware 4.1.2
♠ Posted by ggg in Samsung andriod full arabic firmwares
N7105 multipakage arabic firmware 4.1.2
BOOTLOADER_N7105XXDMC3_1071214_REV04_user_low_ship .zip
CODE_N7105XXDMC3_1071214_REV04_user_low_ship.zip
MODEM_N7105XXDMC3_REV06_CL1217233.zip
CSC English
CSC_DBT_N7105DBTDMD2_1106886_REV04_user_low_ship.z ip
CSC Arabic
CSC_OJV_N7105OJVDMA3_713380_REV04_user_low_ship.zi p
BOOTLOADER_N7105XXDMC3_1071214_REV04_user_low_ship .zip
CODE_N7105XXDMC3_1071214_REV04_user_low_ship.zip
MODEM_N7105XXDMC3_REV06_CL1217233.zip
CSC English
CSC_DBT_N7105DBTDMD2_1106886_REV04_user_low_ship.z ip
CSC Arabic
CSC_OJV_N7105OJVDMA3_713380_REV04_user_low_ship.zi p
N7100 Multipakage arabic firmware 4.1.2
♠ Posted by ggg in Samsung andriod full arabic firmwares
N7100 Multipakage arabic firmware 4.1.2
t03g_0907.pit (3 KB)
BOOTLOADER_N7100XXDLJ2_422394_REV00_user_low_ship. tar.zip
MODEM_N7100XXDLJ2_422394_REV00_user_low_ship.tar.z ip (4.6 MB)
CODE_N7100XXDLJ2_422394_REV00_user_low_ship.tar.zi p (807.6 MB)
CSC English
CSC_XEF_N7100OXADLJ2_422394_REV00_user_low_ship.ta r.zip (245.7 MB)
CSC Arabic
CSC_OJV_N7100OJVDMB1_679347_REV04_user_low_ship.ta r.zip (210.9 MB)
i8190 multipakage arabic firmware 4.1.2
♠ Posted by ggg in Samsung andriod full arabic firmwares
i8190 multipakage arabic firmware 4.1.2
CODE_I8190XXAMA2_809600_REV00_user_low_ship.rar (481.2 MB)
CSC English
CSC_OXE_I8190OXEAMA1_800680_REV00_user_low_ship.ra r (106.9 MB)
CSC Arabic
CSC_OJV_I8190OJVAMC3_1096943_REV00_user_low_ship.r ar (106.5 MB)
the boot and modem data is in Code file
CODE_I8190XXAMA2_809600_REV00_user_low_ship.rar (481.2 MB)
CSC English
CSC_OXE_I8190OXEAMA1_800680_REV00_user_low_ship.ra r (106.9 MB)
CSC Arabic
CSC_OJV_I8190OJVAMC3_1096943_REV00_user_low_ship.r ar (106.5 MB)
the boot and modem data is in Code file
i9082 multi package firmware arabic
♠ Posted by ggg in Samsung andriod full arabic firmwares
i9082 multi package firmware arabic 4.1.2
DefaultCalDataWithBoot_I9082XXAMA8_REV05.rar (84 KB)
CODE_I9082XXAMAB_784570_REV05_user_low_ship.rar (558.2 MB)
MODEM_I9082XXAMA8_REV05.rar (4.8 MB)
CSC English
CSC_OXE_I9082OXEAMA5_784570_REV05_user_low_ship.ra r (114.4 MB)
CSC Arabic
CSC_OJV_I9082OJVAMC1_1028679_REV05_user_low_ship.r ar (139.4 MB)
i9500 arabic multi package firmware
♠ Posted by ggg in Samsung andriod full arabic firmwares
i9500 arabic multi package firmware
GT-9500_NOV.pit (3 KB)
BOOTLOADER_I9500XXUBMF8.rar (478 KB)
PDA_I9500XXUBMF8.rar (1.29 GB)
PHONE_I9500XXUBMF8.rar (4.8 MB)
CSC English
CSC_I9500SERBMF8.rar (144.3 MB)
CSC Arabic
CSC_OJV_I9500OJVBMGA_1123221_REV00_user_low_ship.r ar (128.2 MB)
GT-9500_NOV.pit (3 KB)
BOOTLOADER_I9500XXUBMF8.rar (478 KB)
PDA_I9500XXUBMF8.rar (1.29 GB)
PHONE_I9500XXUBMF8.rar (4.8 MB)
CSC English
CSC_I9500SERBMF8.rar (144.3 MB)
CSC Arabic
CSC_OJV_I9500OJVBMGA_1123221_REV00_user_low_ship.r ar (128.2 MB)
i9500 arabic multi package firmware
♠ Posted by ggg in Samsung andriod full arabic firmwares
i9500 arabic multi package firmware
GT-9500_NOV.pit (3 KB)
BOOTLOADER_I9500XXUBMF8.rar (478 KB)
PDA_I9500XXUBMF8.rar (1.29 GB)
PHONE_I9500XXUBMF8.rar (4.8 MB)
CSC English
CSC_I9500SERBMF8.rar (144.3 MB)
CSC Arabic
CSC_OJV_I9500OJVBMGA_1123221_REV00_user_low_ship.r ar (128.2 MB)
GT-9500_NOV.pit (3 KB)
BOOTLOADER_I9500XXUBMF8.rar (478 KB)
PDA_I9500XXUBMF8.rar (1.29 GB)
PHONE_I9500XXUBMF8.rar (4.8 MB)
CSC English
CSC_I9500SERBMF8.rar (144.3 MB)
CSC Arabic
CSC_OJV_I9500OJVBMGA_1123221_REV00_user_low_ship.r ar (128.2 MB)
S6102 Arabic firmware PDA CSC MODEM
♠ Posted by ggg in Samsung andriod full arabic firmwares
S6102 Arabic firmware PDA CSC MODEM
PDA_S6102_JPLC3.tar.md5 (207.3 MB)
MODEM_S6102_XXLC2.tar.md5 (11.3 MB)
CSC_S6102_OJPLB1.tar.md5 (12.2 MB)
PDA_S6102_JPLC3.tar.md5 (207.3 MB)
MODEM_S6102_XXLC2.tar.md5 (11.3 MB)
CSC_S6102_OJPLB1.tar.md5 (12.2 MB)
s5360 arabic firmware multipakage
♠ Posted by ggg in Samsung andriod full arabic firmwares
s5360 arabic firmware multipackage
PDA_S5360_JPLC1.tar (192.0 MB)
MODEM_S5360_XXLC1.tar (11.0 MB)
CSC_S5360_OJPLC1.tar (11.1 MB)
2nd) i always use this below file it works fine and also fix white screen problem in lafleur phones use it with odin 3.7
S5360JPMA1_S5360OJPMA1_S5360XXLL1_HOME.tar.md5 (222.8 MB)
PDA_S5360_JPLC1.tar (192.0 MB)
MODEM_S5360_XXLC1.tar (11.0 MB)
CSC_S5360_OJPLC1.tar (11.1 MB)
2nd) i always use this below file it works fine and also fix white screen problem in lafleur phones use it with odin 3.7
S5360JPMA1_S5360OJPMA1_S5360XXLL1_HOME.tar.md5 (222.8 MB)
s7562 arabic firmware multi pakage
♠ Posted by ggg in Samsung andriod full arabic firmwares
s7562 arabic firmware multi pakage
also can fix hang on logo phones
BOOTLOADER_S7562XXALHC_1050023_REV02_user_low_ship .tar.md5 (1.2 MB)
CODE_S7562XXALHC_1050023_REV02_user_low_ship.tar.m d5 (842.9 MB)
MODEM_S7562XXALH6_1045218_REV02_user_low_ship.tar. md5 (19.1 MB)
CSC_OJV_S7562OJVALH3_1040167_REV02_user_mid_ship.t ar.md5 (35.1 MB)
also can fix hang on logo phones
BOOTLOADER_S7562XXALHC_1050023_REV02_user_low_ship .tar.md5 (1.2 MB)
CODE_S7562XXALHC_1050023_REV02_user_low_ship.tar.m d5 (842.9 MB)
MODEM_S7562XXALH6_1045218_REV02_user_low_ship.tar. md5 (19.1 MB)
CSC_OJV_S7562OJVALH3_1040167_REV02_user_mid_ship.t ar.md5 (35.1 MB)
i9100 arabic firmware full pakage 4 files
♠ Posted by ggg in Samsung andriod full arabic firmwares
i9300 arabic firmware full pakage 4 files
♠ Posted by ggg in Samsung andriod full arabic firmwares
S5830i arabic firmware multi pakage
♠ Posted by ggg in Samsung andriod full arabic firmwares
S5830M arabic firmware multi pakage
♠ Posted by ggg in Samsung andriod full arabic firmwares
S5830M and S5830C arabic firmware multi pakage
it can fix signal problem also if u flashed phone with wrong firmware before
use odin 1.85
DefaultCalDataWithBoot_S5830iXXLB1_REV00.tar.md5 (270 KB)
PDA_S5830iJPLB1_REV00.tar.md5 (187.7 MB)
GT-S5830i-MULTI-CSC-OJPLA5.tar.md5 (16.4 MB)
PHONE_S5830CVJKL4.tar.md5 (12.5 MB)
it can fix signal problem also if u flashed phone with wrong firmware before
use odin 1.85
DefaultCalDataWithBoot_S5830iXXLB1_REV00.tar.md5 (270 KB)
PDA_S5830iJPLB1_REV00.tar.md5 (187.7 MB)
GT-S5830i-MULTI-CSC-OJPLA5.tar.md5 (16.4 MB)
PHONE_S5830CVJKL4.tar.md5 (12.5 MB)
N8000 arabic firmware multipakage
♠ Posted by ggg in Samsung andriod full arabic firmwares
P3100 arabic firmware 4 files
♠ Posted by ggg in Samsung andriod full arabic firmwares
P3100 arabic firmware 4 files
can fix hang on logo devices
BOOTLOADER_P3100XWALD2_CL448962_REV04_user_low_shi p.tar.md5 (2.3 MB)
PLATFORM_P3100XWALD2_CL448962_REV04_user_low_ship. tar.md5 (981.8 MB)
MODEM_P3100XXLD4_REV_04_CL1128355.tar.md5 (12.0 MB)
CSC_OJV_P3100OJVALD3_CL448962_REV04_user_low_ship. tar.md5 (105.4 MB)
can fix hang on logo devices
BOOTLOADER_P3100XWALD2_CL448962_REV04_user_low_shi p.tar.md5 (2.3 MB)
PLATFORM_P3100XWALD2_CL448962_REV04_user_low_ship. tar.md5 (981.8 MB)
MODEM_P3100XXLD4_REV_04_CL1128355.tar.md5 (12.0 MB)
CSC_OJV_P3100OJVALD3_CL448962_REV04_user_low_ship. tar.md5 (105.4 MB)
i8160 arabic firmware + pit
♠ Posted by ggg in Samsung andriod full arabic firmwares
8160 arabic firmware + pit
nowadays i8160 comes with 4.1.2 once u downgrade it to 2.3.6 or 4.0.3 stuck on black screen so you can downgrade it with this file
GT-I8160_EUR_XX_4G.pit (3 KB)
PDA i8160_low_arabic.tar.md5 (550.0 MB)
i8160_csc_arabic.tar.md5 (117.9 MB)
i always use Odin 3.07 it works very good for me
nowadays i8160 comes with 4.1.2 once u downgrade it to 2.3.6 or 4.0.3 stuck on black screen so you can downgrade it with this file
GT-I8160_EUR_XX_4G.pit (3 KB)
PDA i8160_low_arabic.tar.md5 (550.0 MB)
i8160_csc_arabic.tar.md5 (117.9 MB)
i always use Odin 3.07 it works very good for me
s7560 arabic firmware + pit
♠ Posted by ggg in Samsung andriod full arabic firmwares
s7560 arabic firmware + pit
you can downgrade 4.1.2 to 4.0.3 with this file
signed_kyle_SS_130516.pit (4 KB)
BOOTLOADER_S7560XXAMFA_1230914_REV02_user_low_ship .tar.md5 (1.3 MB)
CODE_S7560XXAMFA_1230914_REV02_user_low_ship.tar.m d5 (797.1 MB)
MODEM_S7560XXAMF7_1230253_REV02_user_low_ship.tar. md5 (19.1 MB)
CSC_OJV_S7560OJVAMF5_1231180_REV02_user_low_ship.t ar.md5 (41.9 MB)
P5100 arabic firmware 4 files
♠ Posted by ggg in Samsung andriod full arabic firmwares
I9505 firmware 4 files separated
♠ Posted by ggg in Samsung andriod full arabic firmwares
CSB_signed_Fusion3_EUR_0325_V2.rar pit file pit link 2 BOOTLOADER_I9505XXUAMDM link1 link2 PLATFORM_I9505XXUAMDM link1 link2 MODEM_I9505XXUAMDM link1 link2 CSC_ITV_I9505ITVAMDB European european CSC_OJV_I9505OJVAMDC Arabic farsi urdu CSC_OJV_I9505OJVAMDC | |

|  |
Android How to Upgrade Google Nexus 4 to Android 4.3 Jelly Bean
♠ Posted by ggg
CyanogenMod 10.1 M2 Android v4.3 Jelly Bean provides an immense
exhilaration to those LG Google Nexus 4 E960 users desiring to enjoy the
features of Jelly Bean 4.3 ROM. CyanogenMod, also known as simply CM,
is undoubtedly the most greatly acknowledged unauthorized Android
firmware, and day-by-day they are increasing their compatibility with
numerous old and freshly arriving Android devices from different
manufacturers, including our LG Google Nexus 4 E960. Many reviews show
that CyanogenMod provides much more facilities than the official Android
firmware. Installing CyanogenMod 10.1 M2 Android 4.3 Jelly Bean JDQ39
on your LG Google Nexus 4 E960 will enable its user to sustain in the
Jelly Bean environment.
So in this tutorial we will be showing you an installation guide
regarding using CyanogenMod 10.1 M2 Jelly Bean 4.3 JDQ39 ROM on LG
Google Nexus 4 E960. Just follow the simple steps given below:
Disclaimer:
This tutorial will definitely work when using LG Google Nexus 4 E960
only. While working of it on others is not yet confirmed. On applying
this installation to another model or device may give an unwanted
result. While applying this update we will not be responsible if
anything occurs to your device, so continue at your own risk.
Pre-Requisite:
- For successful completion of this rooting process charge your phone up to a minimum of 75% battery.
- You must take a back-up of all your personnel items and other impotent data, such as Call Logs, SMS, Contacts, Audios, Images, Videos, APN (Access Point Names) settings, Bookmarks, MMS settings, on your phone.
- One must install a custom recovery image particularly for his Android device. To do this, ClockworkMod Recovery should be downloaded using the Internet.
- If you have not, then you must unlock your Android device’s Bootloader.
Steps for installing CM10.1 M2 Android 4.3 Jelly Bean JDQ39 ROM for LG Google Nexus 4 E960:

Step 1
From your Android device disconnect & remove the memory card and
insert it in your Computer using a card reader. You must not use USB
cable, since CyanogenMod do not work properly through USBs.
Step 2
Now do repartition of memory card, by just doing right click on the existing partition, choose Resize
option, and then apply the sufficient amount of space towards your new
partition. Make your new partition as your primary partition of Ext4
file system. Press the Apply option & remove your memory card now.
Step 3
Using the Internet, download: Android 4.3 CM10.1 M2 ROM for LG Google Nexus 4 E960.zip
file and Google Apps in your Computer. Again reinsert it in the PC and
then copy the above downloaded zip file in a folder named as “root” under your SD Card. Don’t run or try to open this file, just copy it in the folder.
Step 4
Now, remove your memory card from the Computer. Then shut-down your
Android smartphone and then again insert back memory card in the phone.
Step 5
Now, enter into the Recovery Mode. For this just press the Down Volume & Home button simultaneously, and while pressing these buttons press down your Power button at the same time.
Step 6
Since you are now in the Recovery Mode, select the “install zip from SD card” option, and then select the “choose zip from SD card” option to browse into your SD Card. Now, navigate up to the downloaded “Android 4.3 CM10.1 M2 ROM for LG Google Nexus 4 E960.zip” file for flashing it on your phone.
Step 7
Now get yourself back to the main menu by pressing back button and then reboot your Android phone.
Step 8
After this, you’ll have CyanogenMod 10.1 M2 ROM installed over your Android device.
Finished!
Samsung Galaxy Note II (GT-N7100) receives official Android 4.3 Jelly Bean update
♠ Posted by ggg in Symphony Android
CHANGES AND IMPROVEMENTS IN ANDROID 4.3 UPDATE
- GALAXY GEAR Support
- TRIM Support (Makes the device much faster)
- Samsung KNOX
- Samsung Wallet (Pre-loaded)
- Better RAM management
- Core UI elements updated to the ones on the Galaxy S4 (Galaxy S4′s theme all over)
- New Samsung Keyboard
- GPU drivers have been updated (Higher GPU benchmark scores)
- New Lockscreen: Multiple Widgets, improved ripple effect than Android 4.1.2, ability to change clock size and set a personal message
- New screen modes (From S4): Adapt Display and Professional Photo
- Daydream
- Driving mode
- Actionable notifications
- Move-to-SD-card feature
- New Camera mode : Sound and Shot
- New Additions in Notification Centre
- Completely revamped Settings UI (Tabbed interface – Exactly like the Galaxy S4)
- Implementation of Voice controls (Let’s you control various parts of the phone using voice commands – Galaxy S4 feature)
- New Samsung Apps: Calculator, Clock, Contacts, Gallery, Music
- Full screen Samsung apps
- New S-Voice (from Galaxy S4)
download :Hotfile.com: One click file hosting: N7100XXUEMK4_N7100ODDEMK1_INU.zip
How to Install CM10.1 android 4.2.1 Jelly Bean ROM on Samsung Galaxy S3 I9300
♠ Posted by ggg in Symphony Android
In this tutorial
we will guide you step-by-step on how to install CM10.1 Android 4.2.1
Jelly Bean ROM on Samsung Galaxy S3 I9300.
CyanogenMod 10.1 Android v4.2.1 Jelly Bean provides an immense
exhilaration to those by Samsung Galaxy S3 I9300 users desiring to enjoy
the features of Jelly Bean 4.2.1 ROM. CyanogenMod, also known as simply
CM, is undoubtedly the most greatly acknowledged unauthorized Android
firmware, and day-by-day they are increasing their compatibility with
numerous old and freshly arriving Android devices from different
manufacturers., including our Samsung Galaxy S3 I9300. Many reviews show
that CyanogenMod provides much more facilities than the official
Android firmware. Installing CyanogenMod 10.1 Android 4.2.1 Jelly Bean
on your Samsung Galaxy S3 I9300 will enable its user to sustain in the
Jelly Bean environment.
So in this tutorial we will be showing you an installation guide
regarding using CyanogenMod 10.1 Jelly Bean 4.2.1 ROM on Samsung Galaxy
S3 I9300. Just follow the simple steps given below:
Disclaimer
This tutorial will definitely work when using Samsung Galaxy S3 I9300
only. While working of it on others is not yet confirmed. On applying
this installation to another model or device may give an unwanted
result. While applying this update we will not be responsible if
anything occurs to your device, so continue at your own risk.
Pre-Requisite
- For successful completion of this rooting process charge your phone up to a minimum of 75% battery.
- You must take a back-up of all your personnel items and other impotent data, such as Call Logs, SMS, Contacts, Audios, Images, Videos, APN (Access Point Names) settings, Bookmarks, MMS settings, on your phone.
- One must install a custom recovery image particularly for his Android device. To do this, ClockworkMod Recovery should be downloaded using the Internet.
- If you have not, then you must unlock your Android device’s Bootloader. But due to unlocking of Bootloader, your Android device may lose its official Warranty. So to overcome this, download fastboot from Internet.
Steps for installing CM10.1 Android 4.2.1 Jelly Bean ROM on Samsung Galaxy S3 I9300
Step 1
From your Android device disconnect & remove the memory card and
insert it in your Computer using a card reader. You must not use USB
cable, since CyanogenMod do not work properly through USBs.
Step 2
Now do repartition of memory card, by just doing right click on the existing partition, choose Resize
option, and then apply the sufficient amount of space towards your new
partition. Make your new partition as your primary partition of Ext4
file system. Press the Apply option & remove your memory card now.
Step 3
Using the Internet, download: CM10.1 Android 4.2.1 Jelly Bean ROM for Samsung Galaxy S3 I9300.zip
file and Google Apps in your Computer. Again reinsert it in the PC and
then copy the above downloaded zip file in a folder named as “root” under your SD Card. Don’t run or try to open this file, just copy it in the folder.
Step 4
Now, remove your memory card from the Computer. Then shut-down your
Android smartphone and then again insert back memory card in the phone.
Step 5
Now, enter into the Recovery Mode. For this just press the Down Volume & Home button simultaneously, and while pressing these buttons press down your Power button at the same time.
Step 6
Since you are now in the Recovery Mode, select the “install zip from SD card” option, and then select the “choose zip from SD card” option to browse into your SD Card. Now, navigate up to the downloaded “CM10.1 Android 4.2.1 Jelly Bean ROM for Samsung Galaxy S3 I9300.zip” file for flashing it on your phone.
Step 7
Now get yourself back to the main menu by pressing back button and then reboot your Android phone.
Step 8
After this, you’ll have CyanogenMod 10.1 ROM installed over your Samsung Galaxy S3 I9300.
Finished!
Android Tools v1.1 [ Faheem Anjum ]
♠ Posted by ggg in All Android tools
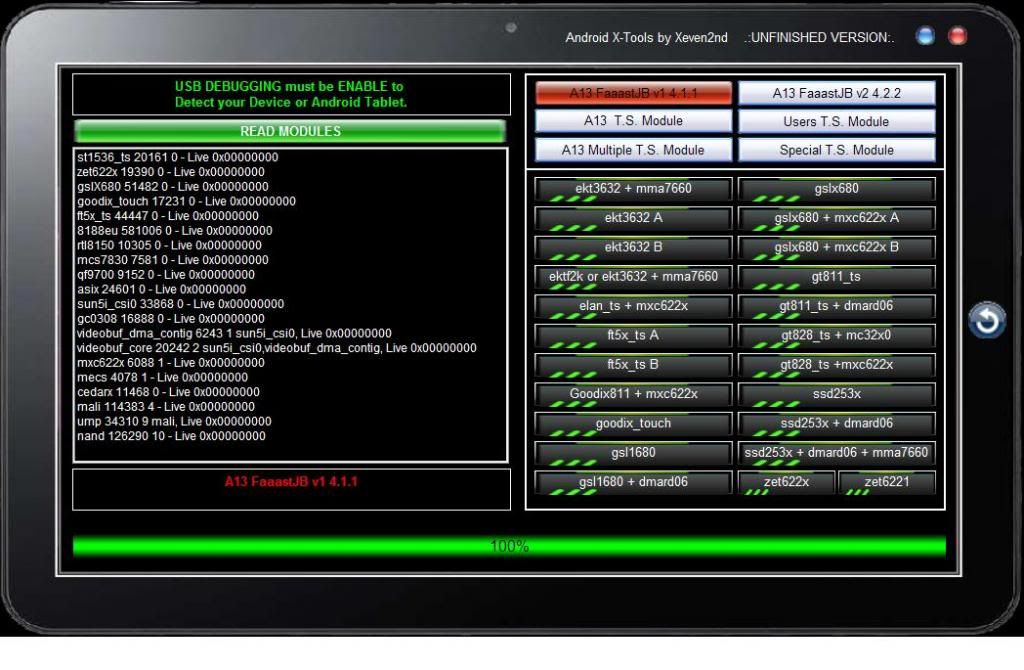
Check device
- you can now check device by clicking "search device" in device check icon
if device is detected it means device is set to ENABLE USB DEBUGGING
- if device is detected you can use WIPE DATA
if device is not detected proceed to flashing using LiveSuit and ETC.
Scr!tp Tools
- ENABLE USB DEBUGGING must be set on device or android tablet
- added "search device" to know if tablet is detected before scr!pt editing.
FIX TOUCH SCREEN TOOLS
- ENABLE USB DEBUGGING must be set on device or android tablet
- A13 All winner chips is supported but you can do experimental in other device chips
but use at your own risk and always do back up rom or firmware prepared just incase what
happen to your device after injecting fixers tools.
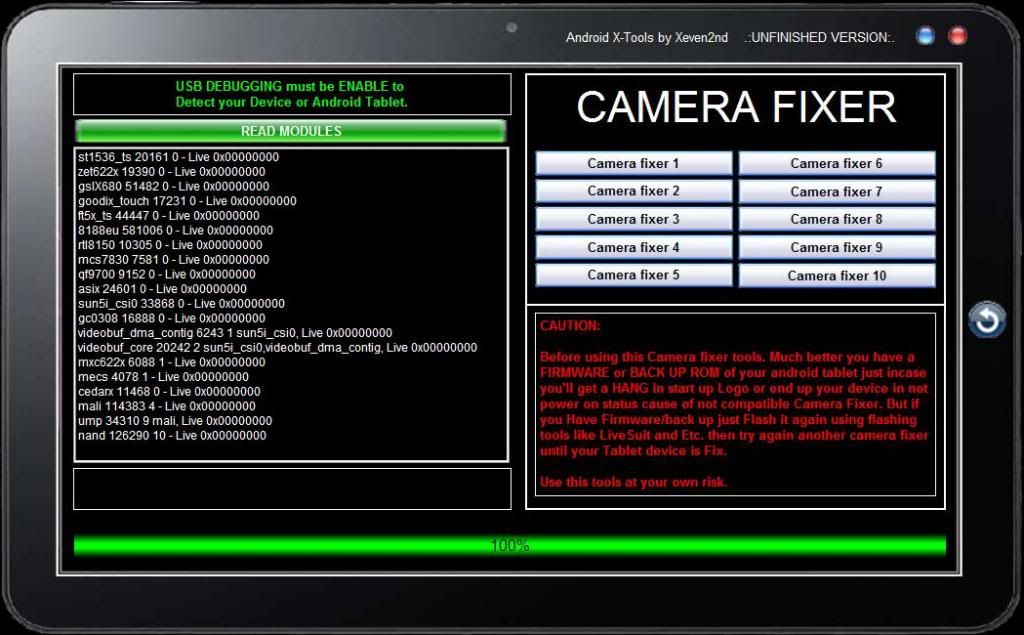
CAMERA FIXER TOOLS
- ENABLE USB DEBUGGING must be set on device or android tablet
- A13 All winner chips is supported but you can do experimental in other device chips
but use at your own risk and always do back up rom or firmware prepared just incase what
happen to your device after injecting fixers tools.
COMBO FIXER TOOLS
- ENABLE USB DEBUGGING must be set on device or android tablet
- this tools can only fix on specific model available in my shell button.
- you can do experiment by injecting scr!pt to other device but use at your own risk.
Android X-tools by Xeven2nd Version 2
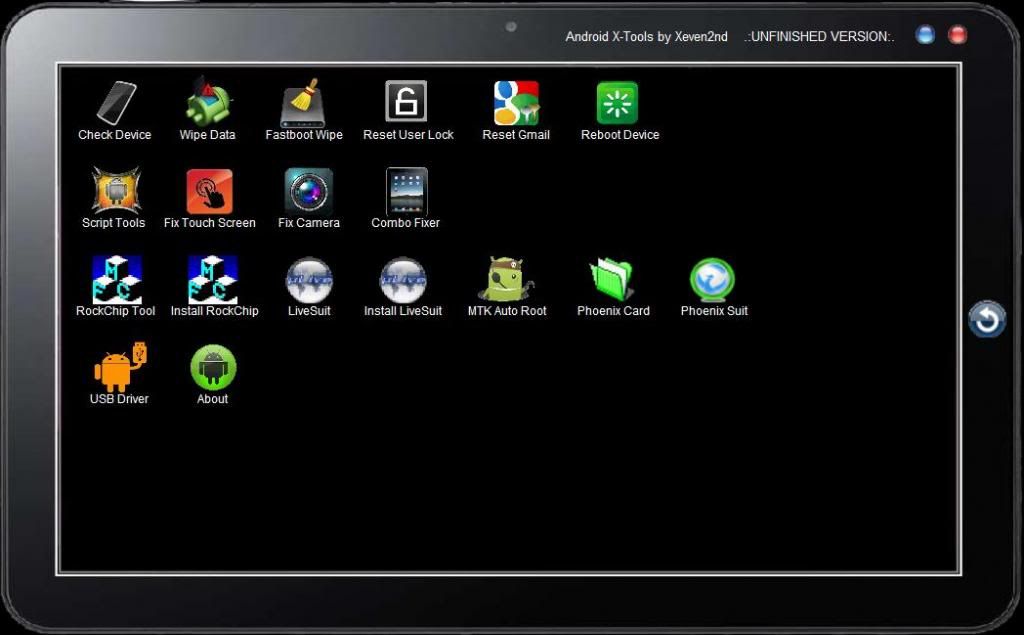
FEATURES ADDED:
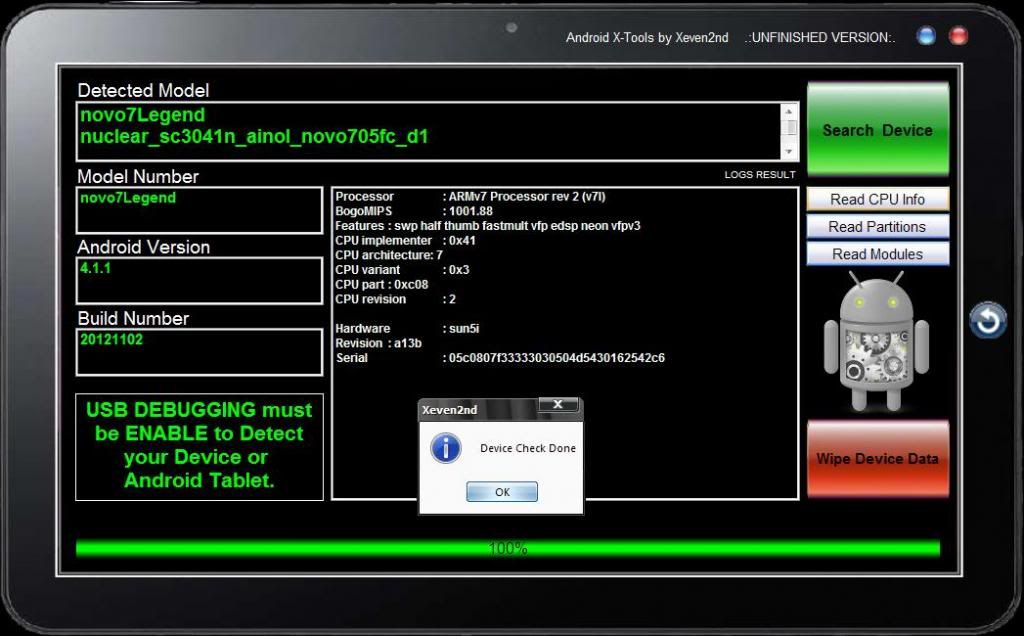
Check device
- you can now check device by clicking "search device" in device check icon
if device is detected it means device is set to ENABLE USB DEBUGGING
- if device is detected you can use WIPE DATA
if device is not detected proceed to flashing using LiveSuit and ETC.
Scr!tp Tools
- ENABLE USB DEBUGGING must be set on device or android tablet
- added "search device" to know if tablet is detected before scr!pt editing.

FIX TOUCH SCREEN TOOLS
- ENABLE USB DEBUGGING must be set on device or android tablet
- A13 All winner chips is supported but you can do experimental in other device chips
but use at your own risk and always do back up rom or firmware prepared just incase what
happen to your device after injecting fixers tools.
CAMERA FIXER TOOLS
- ENABLE USB DEBUGGING must be set on device or android tablet
- A13 All winner chips is supported but you can do experimental in other device chips
but use at your own risk and always do back up rom or firmware prepared just incase what
happen to your device after injecting fixers tools.
COMBO FIXER TOOLS
- ENABLE USB DEBUGGING must be set on device or android tablet
- this tools can only fix on specific model available in my shell button.
- you can do experiment by injecting scr!pt to other device but use at your own risk.

if you think software is helpful then send some donations

PAYPALL
XANDS_777@yahoo.com
SMART MONEY
5299-6735-8031-5110
PLEASE HELP TO THE VICTIMS OF TYPOON HAIYAN
Download Here
How to install Android 4.2.2 Jelly Bean on Samsung Galaxy S Duos S7562
♠ Posted by ggg in Symphony Android
Try this tutorial we will guide you step-by-step on how to install Android 4.2.2 Jelly Bean on your Samsung Galaxy S Duos S7562.
The official Android version of 4.2.2 Jelly Bean from Google does not yet supported by Samsung Galaxy S Duos S7562 smartphone. The proprietors of Samsung Galaxy S Duos S7562 may imagine Android 4.2.2 OS Jelly Bean very soon. The Samsung Galaxy S Duos S7562 users will catch an announcement when the Android 4.2.2 Jelly Bean update will be available for their model. However, many tech-lovers just can’t wait more to see Android 4.2.2 Jelly Bean on their Samsung Galaxy S Duos S7562 smart phone. Hence, those Samsung Galaxy S Duos S7562 users who are fancy to upgrade their smartphone with Jelly Bean manually can do so by installing CyanogenMod Samsung Galaxy S Duos S7562.
To know more about CyanogenMod, you can also view What is CyanogenMod.
Samsung Galaxy S Duos S7562 is featured with 1 GHz Cortex-A5 Processor, a RAM of 768 MB, and 4 GB Internal Storage. Like the previous Samsung Galaxy S Duos S7562’s Android devices, it has also created a large user base or fan base. With an affordable price range, they also have provided some really good features with an elegant design and stunning look.
CyanogenMod 10.1 Android 4.2.2 Jelly Bean provides an immense exhilaration to those Samsung Galaxy S Duos S7562 users desiring to enjoy the features of Jelly Bean 4.2.2 ROM. CyanogenMod, also known as simply CM, is undoubtedly the most greatly acknowledged unauthorized Android firmware, and day-by-day they are increasing their compatibility with numerous old and freshly arriving Android devices from different manufacturers, including our Samsung Galaxy S Duos S7562. Many reviews show that CyanogenMod provides much more facilities than the official Android firmware. Installing CyanogenMod 10.1 Android 4.2.2 Jelly Bean on your Samsung Galaxy S Duos S7562 will enable its user to sustain in the Jelly Bean environment.
Also, after installing CyanogenMod (CM) on your Android device, you’ll attain full access to your entire system, and then can easily run all those unpermitted apps which you couldn’t previously on the official ROM since they need root permissions.
Due to installation of CyanogenMod ROM, your Android device will lose its official Warranty and while flashing CyanogenMod firmware on your device, we will not be responsible if anything occurs to your Android device, so continue at your own risk.
From your Android device disconnect & remove the memory card and insert it in your Computer using a card reader. You must not use USB cable, since CyanogenMod do not work properly through USBs. But in-case, if you haven’t Memory-card reader then you may try to connect your Samsung Galaxy S Duos S7562 with Computer through USB also. But we’ll always recommend you to use card reader.
Step 2
Now, download “CM10.1 Android 4.2.2 Samsung Galaxy S Duos S7562.zip” file in your Computer.
Step 3
Next download CyanogenMod 10.1 Gapps.zip to your Computer.
Note: Here try to understand “What is CyanogenMod Gapps”
Since official Google apps are bundled only in official ROMs and not in custom ROMs (due to licensing issues), therefore after flashing a custom ROM on your Android device, you need to install GApps (Google Apps) separately particularly for your Android version only.
GApps consists of various apps, such as GMail, Google Play Store, Google Search, Google Backup Transport, Gtalk, Google Calendar, Google Map, Car Home, YouTube, Google Music, Google Sync, Google Docs, and Google Voice, etc.
Step 4
Now, copy the above downloaded zip file in a folder named as “root” under your SD Card. Don’t run or try to open this file, just copy it in the folder.
Step 5
Now, remove your memory card from the Computer. Then shut-down your Android smartphone and then again insert back memory card in the phone.
Step 6
Now, enter into the Recovery Mode. For this just press the Down Volume & Home button simultaneously, and while pressing these buttons press down your Power button at the same time.
Step 7
Since you are now in the Recovery Mode, select the “Wipe Data/Factory Reset” option to wipe off all of the data and after doing it, select “Wipe Cache Partition” option for wiping off all the caches from your phone memory.
Step 8
Now, move into the “Advanced” settings and there select the “Wipe Dalvik Cache” option to wipe out “Dalvik Cache” too from your Android smartphone.
Step 9
Next, select the “Install zip from SD card” option, and then select the “Choose zip from SD card” option to browse into your SD Card. Now, navigate up to the downloaded “CM10.1 Android 4.2.2 Samsung Galaxy S Duos S7562.zip” file for flashing it on your phone.
Step 10
Now get yourself back to the main menu by pressing back button and then reboot your Android phone.
Step 11
After this, you’ll have CyanogenMod 10.1 custom ROM installed over your Android device. Thus now the Samsung Galaxy S Duos S7562 users can enjoy an almost 99.99% identical Android 4.2.2 Jelly Bean ROM in their phones.
Finished!
The official Android version of 4.2.2 Jelly Bean from Google does not yet supported by Samsung Galaxy S Duos S7562 smartphone. The proprietors of Samsung Galaxy S Duos S7562 may imagine Android 4.2.2 OS Jelly Bean very soon. The Samsung Galaxy S Duos S7562 users will catch an announcement when the Android 4.2.2 Jelly Bean update will be available for their model. However, many tech-lovers just can’t wait more to see Android 4.2.2 Jelly Bean on their Samsung Galaxy S Duos S7562 smart phone. Hence, those Samsung Galaxy S Duos S7562 users who are fancy to upgrade their smartphone with Jelly Bean manually can do so by installing CyanogenMod Samsung Galaxy S Duos S7562.
To know more about CyanogenMod, you can also view What is CyanogenMod.
Samsung Galaxy S Duos S7562 is featured with 1 GHz Cortex-A5 Processor, a RAM of 768 MB, and 4 GB Internal Storage. Like the previous Samsung Galaxy S Duos S7562’s Android devices, it has also created a large user base or fan base. With an affordable price range, they also have provided some really good features with an elegant design and stunning look.
CyanogenMod 10.1 Android 4.2.2 Jelly Bean provides an immense exhilaration to those Samsung Galaxy S Duos S7562 users desiring to enjoy the features of Jelly Bean 4.2.2 ROM. CyanogenMod, also known as simply CM, is undoubtedly the most greatly acknowledged unauthorized Android firmware, and day-by-day they are increasing their compatibility with numerous old and freshly arriving Android devices from different manufacturers, including our Samsung Galaxy S Duos S7562. Many reviews show that CyanogenMod provides much more facilities than the official Android firmware. Installing CyanogenMod 10.1 Android 4.2.2 Jelly Bean on your Samsung Galaxy S Duos S7562 will enable its user to sustain in the Jelly Bean environment.
Also, after installing CyanogenMod (CM) on your Android device, you’ll attain full access to your entire system, and then can easily run all those unpermitted apps which you couldn’t previously on the official ROM since they need root permissions.
Benefits by installing CyanogenMod custom ROM
- Through installing CyanogenMod on your Android phone you can get full access into your phone’s internal file system, and thus you can also make potent modifications in them.
- CyanogenMod will also benefit your device by improving the performance and also by enhancing the speed of operating system of your Android device.
- One may feel some sort of irritation when he gets undesired default apps in his Android device by the manufacturers and that too without any uninstall option. In this case, if you have CyanogenMod you can easily remove the unwanted apps from your device.
- It will surely increase battery pack up of Android devices.
- Installing CyanogenMod will also enhance the visual experience of your Android device.
Disclaimer
This tutorial will definitely work when using Samsung Galaxy S Duos S7562 only. While working of it on others is not yet confirmed. On applying this installation to another model or device may give an unwanted result.Due to installation of CyanogenMod ROM, your Android device will lose its official Warranty and while flashing CyanogenMod firmware on your device, we will not be responsible if anything occurs to your Android device, so continue at your own risk.
Pre-Requisite
- For successful completion of installing/flashing CyanogenMod ROM charge your Samsung Galaxy S Duos S7562 up to a minimum of 75% – 85% battery.
- You must take a back-up of all your personnel items and other impotent data, such as Call Logs, SMS, Contacts, Audios, Images, Videos, APN (Access Point Names) settings, Bookmarks, MMS settings, on your Android device.
- If you have not, then you must unlock your Android device’s Bootloader. View here to know more about Why to unlock Android Bootloader.
- You must have rooted down your Samsung Galaxy S Duos S7562 before applying this tutorial. You can take help from here to know more about What does Android Rooting mean.
- Please ensure that all your security suites, like firewall and antivirus, on your Android device as well as on computer must be disabled.
- You must enable USB Debugging mode on your Samsung Galaxy S Duos S7562. Just follow, Settings à Applications à Development à USB debugging. There select the USB Debugging icon.
- You must download and install all the required USB drivers for your Android device.
- One must install a custom recovery image particularly for his Android device. To do this, you can download ClockworkMod Recovery or TWRP Recovery and then install it over your Samsung Galaxy S Duos S7562. View here to know more about What is ClockworkMod (CWM) Recovery.
- You must have installed the latest Java SDK and Android SDK on your computer. However, note here that Android SDK should be installed only when you have successfully installed the Java SDK on your computer.
Steps for installing Android 4.2.2 Jelly Bean custom ROM for Samsung Galaxy S Duos S7562
Step 1From your Android device disconnect & remove the memory card and insert it in your Computer using a card reader. You must not use USB cable, since CyanogenMod do not work properly through USBs. But in-case, if you haven’t Memory-card reader then you may try to connect your Samsung Galaxy S Duos S7562 with Computer through USB also. But we’ll always recommend you to use card reader.
Step 2
Now, download “CM10.1 Android 4.2.2 Samsung Galaxy S Duos S7562.zip” file in your Computer.
Step 3
Next download CyanogenMod 10.1 Gapps.zip to your Computer.
Note: Here try to understand “What is CyanogenMod Gapps”
Since official Google apps are bundled only in official ROMs and not in custom ROMs (due to licensing issues), therefore after flashing a custom ROM on your Android device, you need to install GApps (Google Apps) separately particularly for your Android version only.
GApps consists of various apps, such as GMail, Google Play Store, Google Search, Google Backup Transport, Gtalk, Google Calendar, Google Map, Car Home, YouTube, Google Music, Google Sync, Google Docs, and Google Voice, etc.
Step 4
Now, copy the above downloaded zip file in a folder named as “root” under your SD Card. Don’t run or try to open this file, just copy it in the folder.
Step 5
Now, remove your memory card from the Computer. Then shut-down your Android smartphone and then again insert back memory card in the phone.
Step 6
Now, enter into the Recovery Mode. For this just press the Down Volume & Home button simultaneously, and while pressing these buttons press down your Power button at the same time.
Step 7
Since you are now in the Recovery Mode, select the “Wipe Data/Factory Reset” option to wipe off all of the data and after doing it, select “Wipe Cache Partition” option for wiping off all the caches from your phone memory.
Step 8
Now, move into the “Advanced” settings and there select the “Wipe Dalvik Cache” option to wipe out “Dalvik Cache” too from your Android smartphone.
Step 9
Next, select the “Install zip from SD card” option, and then select the “Choose zip from SD card” option to browse into your SD Card. Now, navigate up to the downloaded “CM10.1 Android 4.2.2 Samsung Galaxy S Duos S7562.zip” file for flashing it on your phone.
Step 10
Now get yourself back to the main menu by pressing back button and then reboot your Android phone.
Step 11
After this, you’ll have CyanogenMod 10.1 custom ROM installed over your Android device. Thus now the Samsung Galaxy S Duos S7562 users can enjoy an almost 99.99% identical Android 4.2.2 Jelly Bean ROM in their phones.
Finished!
————————————————————————————————————————————————–
Update: The link for downloading CyanogenMod 10.1 ROM for Samsung Galaxy S Duos S7562 has
been removed from this tutorial as it had become a ‘dead link’ after
sometime (as reported by many of our site readers!). Keep checking back
our site as we will soon be updating the new working link for
downloading the ROM.